Make.com Router Tutorial: Create Multiple Automation Paths in 2026
Make.com Router Tutorial is one of the most useful topics to master when you want a single automation to make decisions and send data down different paths. A Make.com Router lets one scenario branch into multiple routes so different actions can run based on filters, conditions, or fallback logic. Instead of creating separate scenarios for every situation, you can control several outcomes inside one workflow. In this XVIFS guide, you will learn how to create a Router scenario step by step, add filters, connect different action modules, test your workflow, activate it, and monitor executions.
What Is a Router in Make.com?
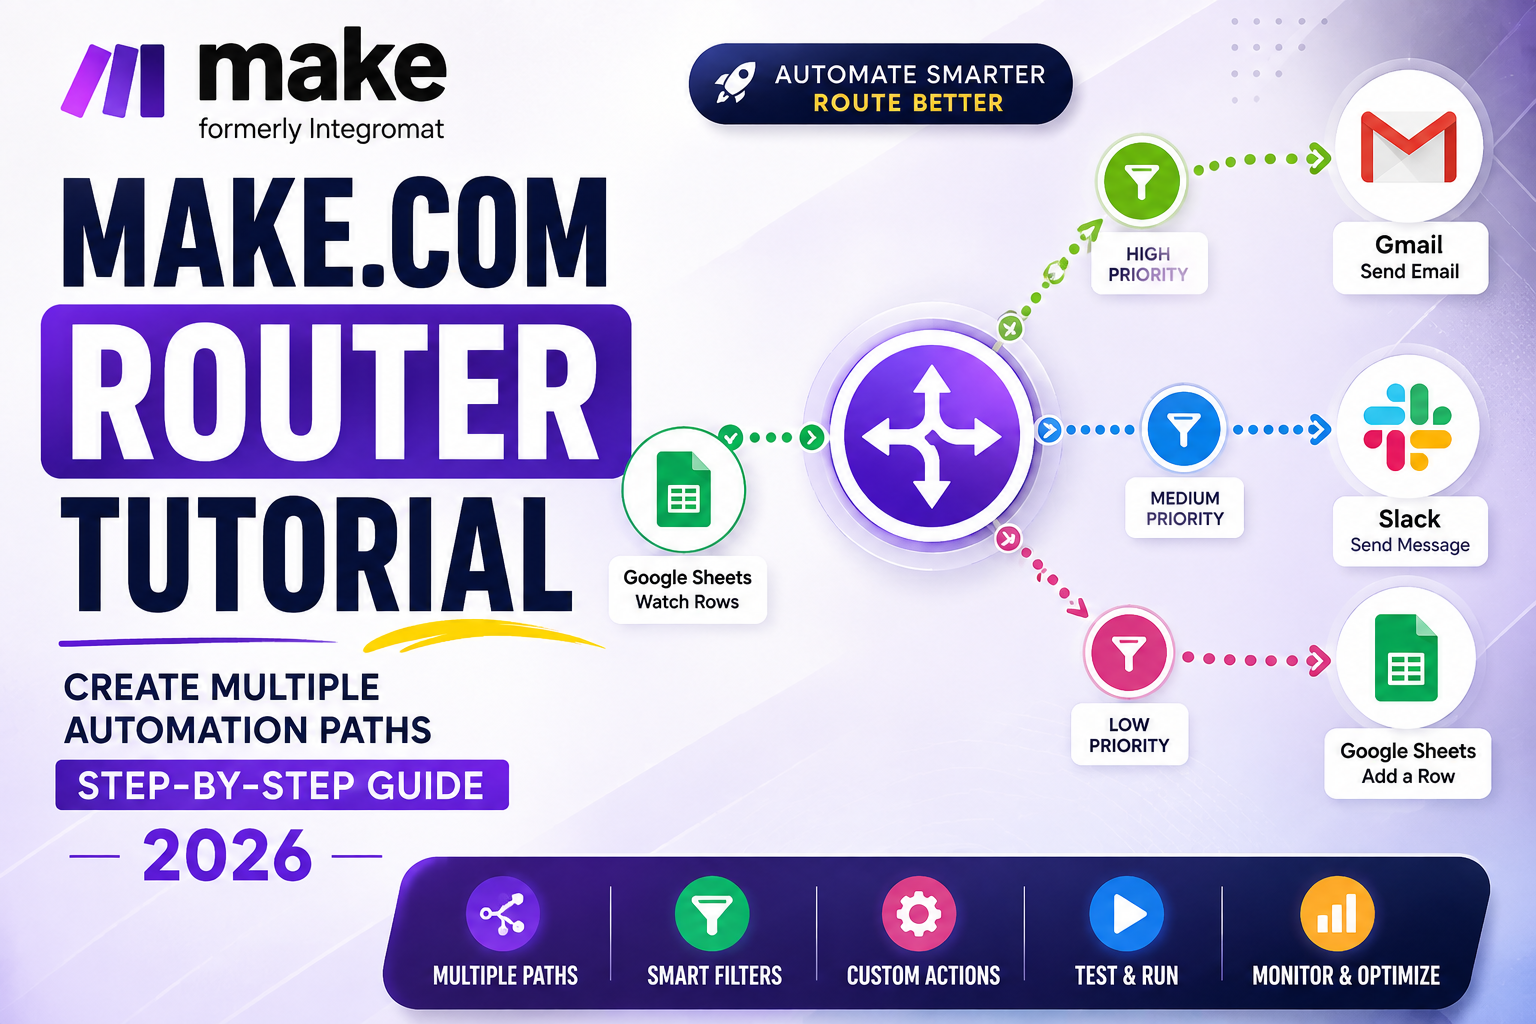
A Router is a flow-control tool that branches one scenario into multiple routes. Each route can contain its own filters and action modules. For example, a Google Sheets order can be routed to Gmail when priority is High, Slack when priority is Medium, or another Google Sheet when priority is Low. For the official technical reference, see the Make Router documentation. For related XVIFS guides, see our Make.com Filters Tutorial, Make.com Iterator Tutorial, and Make.com Array Aggregator Tutorial. New to Make.com automation? Start with our Make.com Tutorial for Beginners: Complete Automation Guide 2026 to understand scenarios, triggers, actions, data mapping, filters, routers, and other core Make.com concepts before building advanced workflows.
How the Make.com Router Works
A Make.com Router sits after a source module and splits incoming bundles into separate routes. Each route can have its own filter and action modules, allowing one scenario to handle several outcomes without duplicating the entire automation.
Think of the Router as the branching point and filters as the decision rules. The Router creates the paths; filters decide whether a bundle is allowed to continue down each path.
Routers are especially useful in larger task automation workflows, where one process needs to send different tasks, records, or requests down separate paths based on business rules and conditions.
How to Create Multiple Routes in Make.com
To create multiple routes in Make.com, add a Router after the module that produces the data you want to evaluate. Each route can then contain its own filter and action modules, allowing one scenario to handle different outcomes without building separate automations.
- Add your source module: Use a trigger such as Google Sheets, Webhooks, Forms, or another app.
- Add a Router: Insert the Flow Control Router after the source module.
- Create separate routes: Add one route for each outcome you want the scenario to handle.
- Add filters: Define the condition that determines which bundles should continue through each route.
- Add action modules: Connect Gmail, Slack, Google Sheets, Airtable, or other apps to each route.
- Run once and test: Use sample data to confirm that each route receives the correct bundles.
If you need a deeper explanation of route conditions, see our Make.com Filters Tutorial. For complete Make.com fundamentals, return to our Make.com Tutorial for Beginners.
How to Use the Make.com Router: Step-by-Step
Step 1: Create a New Scenario
Log in to Make and create a new scenario. This opens the scenario builder where you connect apps, define logic, and control how data moves through your automation. For this example, we will build an order-routing workflow.
Step 2: Add a Source Module
Add the module that generates the data. In this example, use Google Sheets → Watch Rows. Your sheet can include fields such as Order ID, Customer, Email, and Priority. The Priority value will later determine which route handles each record.
Step 3: Add the Make.com Router
Click the plus button after your source module, search for Router, and add the Flow Control Router. The scenario can now branch from one source into several independent processing paths.
Step 4: Plan the Router Logic
Decide what each route should accomplish before adding more modules. In this tutorial the logic is simple: High Priority, Medium Priority, and Low Priority. Important: the illustration shows a “Pass through empty bundles” option; treat that part as a conceptual visual rather than a required current Router setting. The core Router workflow is based on routes, filters, route order, and fallback handling.
Step 5: Add Multiple Routes
Create the different paths required by your automation. For example: Route 1 for High Priority, Route 2 for Medium Priority, and Route 3 for Low Priority. Clear route labels make larger scenarios much easier to maintain.
Step 6: Set Filter Conditions for Each Route
Add a filter to each route connection. For example, configure Route 1 as Priority → Equal to → High, Route 2 as Medium, and Route 3 as Low. Filters decide whether an incoming bundle is allowed to continue through a particular route.
Step 7: Add Action Modules to Each Route
Connect the action that should run after each route. A practical setup is High Priority → Gmail, Medium Priority → Slack, and Low Priority → Google Sheets. Each route can contain different apps and actions based on your business process.
Step 8: Test and Run Your Scenario
Click Run once and send controlled sample records through the workflow. Test High, Medium, and Low priority values separately and confirm that each bundle reaches the expected action module.
Step 9: Save and Activate the Scenario
After successful testing, save the scenario and configure scheduling or activation according to your trigger. Before going live, recheck connections, filters, mappings, destination modules, and the results of your test runs.
Step 10: Monitor and Review Executions
Review scenario history regularly. Check successful runs, failed modules, unexpected routes, and missing data. Execution history is one of the fastest ways to identify filter or mapping problems in a live automation.
Does the Make.com Router Run Routes in Parallel?
Although the Router visually creates several branches, Make documents Router routes as being processed sequentially rather than in parallel. Keep route order in mind when designing workflows where execution sequence matters.
How to Use a Fallback Route in Make.com Router
A fallback route is useful when incoming data does not match the conditions on your other routes. For example, if your normal priority values are High, Medium, and Low but a record arrives with an unexpected value, a fallback route can send that record to an administrator or exception-handling process.
Make.com Router vs Filters: What Is the Difference?
Router = creates paths. Filter = decides whether data passes through a particular connection.
Make.com Router Conditions and Routing Logic
Routing logic becomes more powerful when each route has a clear condition. For example, one route can handle high-priority orders, another can handle standard orders, and a fallback route can catch unexpected values.
For complex logic, keep each condition easy to understand and avoid overlapping filters unless you intentionally want the same bundle to continue through more than one route. Test every important condition with sample data before turning the scenario on.
Real-World Make.com Router Examples and Use Cases
Lead management: Hot leads can go to sales immediately, warm leads to an email sequence, and cold leads to a database. Customer support: Billing requests can go to finance, technical issues to support, and sales enquiries to the sales team. E-commerce: High-value orders can trigger a manager alert, international orders can enter a shipping workflow, and standard orders can follow normal fulfilment. Content automation: Blog content can move to WordPress, video tasks to a video workflow, and social content to a publishing workflow.
How to Troubleshoot a Make.com Router
If a bundle goes down the wrong route, inspect the route filters first. Check the operator, mapped field, expected value, and whether the incoming data uses the format you expect. Also review route order and execution history.
If no route receives the bundle, verify that at least one filter can match the incoming data or configure a fallback route for unmatched values. If more than one route runs unexpectedly, review whether your filter conditions overlap.
Common Make.com Router Mistakes
- Using incorrect or overly broad filter conditions.
- Forgetting to test every important route.
- Ignoring route order in complex scenarios.
- Failing to handle unexpected data.
- Building complicated logic before testing a simple version.
Make.com Router Best Practices for Reliable Workflows
- Give every filter and route a clear descriptive name.
- Use realistic sample data during testing.
- Test each route independently before activation.
- Use fallback handling when unexpected values are possible.
- Review execution history after going live.
- Keep routing logic as simple as the business process allows.
Frequently Asked Questions
How many routes can I add to a Make.com Router?
You can add multiple routes to a Router and give each route its own filter and actions. In practice, keep the number of routes manageable so the scenario remains easy to test and maintain.
Can one bundle go through multiple Make.com Router routes?
Yes, a bundle can continue through more than one route when it satisfies the filters on those routes. If you want mutually exclusive outcomes, design the filter conditions so only the intended route can match.
How do I use a Router in Make.com?
Add a Router after your source module, create the routes you need, place a filter on each route when required, and connect the appropriate action modules. Run the scenario with sample data to confirm that each bundle follows the correct route.
What does a Router do in Make.com?
It branches a scenario into multiple processing paths so different actions can run according to your workflow logic and route filters.
Can I add filters to Router routes?
Yes. Filters are commonly placed on route connections to determine which bundles are allowed to continue through that path.
Does a Make.com Router run routes in parallel?
No. Make’s documentation describes Router routes as being processed sequentially.
What is a fallback route?
It handles data that does not meet the conditions of your other routes, making it useful for exception handling.
Can I use different apps on different routes?
Yes. One route can send an email, another can post to Slack, another can update Google Sheets, and additional routes can connect to other compatible apps.
Conclusion: Master the Make.com Router
For the next step, continue with our Make.com Filters Tutorial for route conditions, the Make.com Iterator Tutorial for array processing, and the Make.com beginner guide for the full automation framework.
The Make.com Router Tutorial becomes easy to understand when you remember the basic structure: Source → Router → Filters → Routes → Actions. Start with two or three simple routes, test each condition carefully, and then expand the workflow as your automation requirements grow. Routers become even more powerful when combined with filters, iterators, aggregators, APIs, webhooks, and other Make tools. Continue exploring XVIFS for practical automation tutorials and business software guides.