
Make.com JSON Tutorial: Parse, Create and Map JSON Data
Working with API responses, webhooks, automation tools, and scenario blueprints often means working with JSON. In this Make.com JSON Tutorial, you will learn how to parse JSON, understand objects and arrays, extract nested values, map the resulting data into other Make.com modules, and how to import JSON into Make when the file is a Make.com scenario blueprint.
JSON may look complicated when you first see brackets, keys, arrays, and nested objects. The good news is that Make.com can turn raw JSON into structured fields that you can visually select and map without writing a full application.
What Is JSON in Make.com?
JSON stands for JavaScript Object Notation. It is a lightweight data format widely used by APIs, webhooks, SaaS platforms, and automation services to exchange structured information.
{
  "name": "John Doe",
  "email": "john@example.com",
  "status": "active",
  "orders": [
    {"id": 101, "total": 120},
    {"id": 102, "total": 85}
  ]
}
In this example, name, email, and status are simple fields, while orders is an array containing multiple order objects.
How Make.com JSON Works
Make.com JSON workflows usually follow a simple pattern: receive JSON from a webhook or API, convert the data into a structure Make.com can understand, map the required fields, and send those values to the next app or module.
When JSON arrives as raw text, use Parse JSON to turn it into mappable fields. When another API or service requires a JSON payload from Make.com, use Create JSON or build the required JSON body in the relevant module.
Make.com JSON Tutorial: How Parsing Works
This Make.com JSON Tutorial uses the Parse JSON module to turn raw JSON text into structured data Make.com can understand. Once parsed, individual values become available for mapping into Google Sheets, Gmail, Airtable, databases, HTTP requests, or other modules.
Step 1: Create a New Make.com Scenario
Open Make.com and create a new scenario. Your first module should be the source of the JSON data. For practice, a Custom Webhook is useful because it can receive a sample JSON payload directly.
Step 2: Receive Your JSON Data
Add a webhook or another source such as an HTTP request. Run the scenario once and send sample data so Make.com can detect the structure. Always inspect the incoming bundle before you start mapping fields.
Step 3: Add the Parse JSON Module
Add the JSON app and choose Parse JSON. Map the raw JSON string into the JSON string/content field. If Make.com needs a data structure, generate one from a representative sample payload.
Step 4: Understand Objects, Arrays, and Nested Data
An object contains named key-value pairs. An array contains a list of values or objects. Nested JSON simply means that an object or array exists inside another object. Understanding this distinction is important because arrays often require additional processing when you want to handle every item separately.
Step 5: Map Parsed JSON Fields
After parsing, open the next module and click the field you want to populate. Make.com will display the parsed values in its mapping panel. Select fields such as name, email, ID, status, city, or any other value required by the destination app.
Step 6: Handle JSON Arrays
If the JSON contains an array such as multiple orders, products, leads, or line items, you may need an Iterator to process each item individually. The Iterator converts the array into separate bundles that downstream modules can process one by one.
Step 7: Map Nested JSON Values
For nested data, expand the relevant collection in Make.com’s mapping panel and select the exact child field. For example, an address object might contain separate city, ZIP code, and country values.
Step 8: Send the Parsed Data to Another App
Add your destination module. For example, you can use Google Sheets > Add a Row and map the parsed JSON fields into spreadsheet columns. The same approach works for CRMs, email tools, project-management systems, and databases.
Step 9: Test Your Make.com JSON Automation
At this stage of the Make.com JSON Tutorial, click Run once and send a realistic sample payload. Check every module’s input and output. Confirm that the parsed values are appearing in the correct destination fields and that arrays or nested values are handled as expected.
Step 10: Turn On the Scenario
Once testing is successful, save the scenario and turn scheduling on. New JSON payloads can then be parsed and mapped automatically whenever your trigger runs.
How to Create JSON in Make.com
Use Create JSON when you need Make.com to build a structured JSON payload from mapped values. This is useful when sending data to an API, webhook, database, or another service that expects a specific JSON format.
- Add the JSON app and choose Create JSON.
- Create or select the required data structure.
- Map values from earlier modules into the JSON fields.
- Run the scenario once and inspect the generated JSON output.
- Pass the generated JSON to the destination module, such as the Make.com HTTP Module.
For API workflows, the most common pattern is: source data → Create JSON → HTTP request → API response. Keep field names and data types aligned with the API documentation to avoid validation errors.
Parse JSON vs Create JSON in Make.com
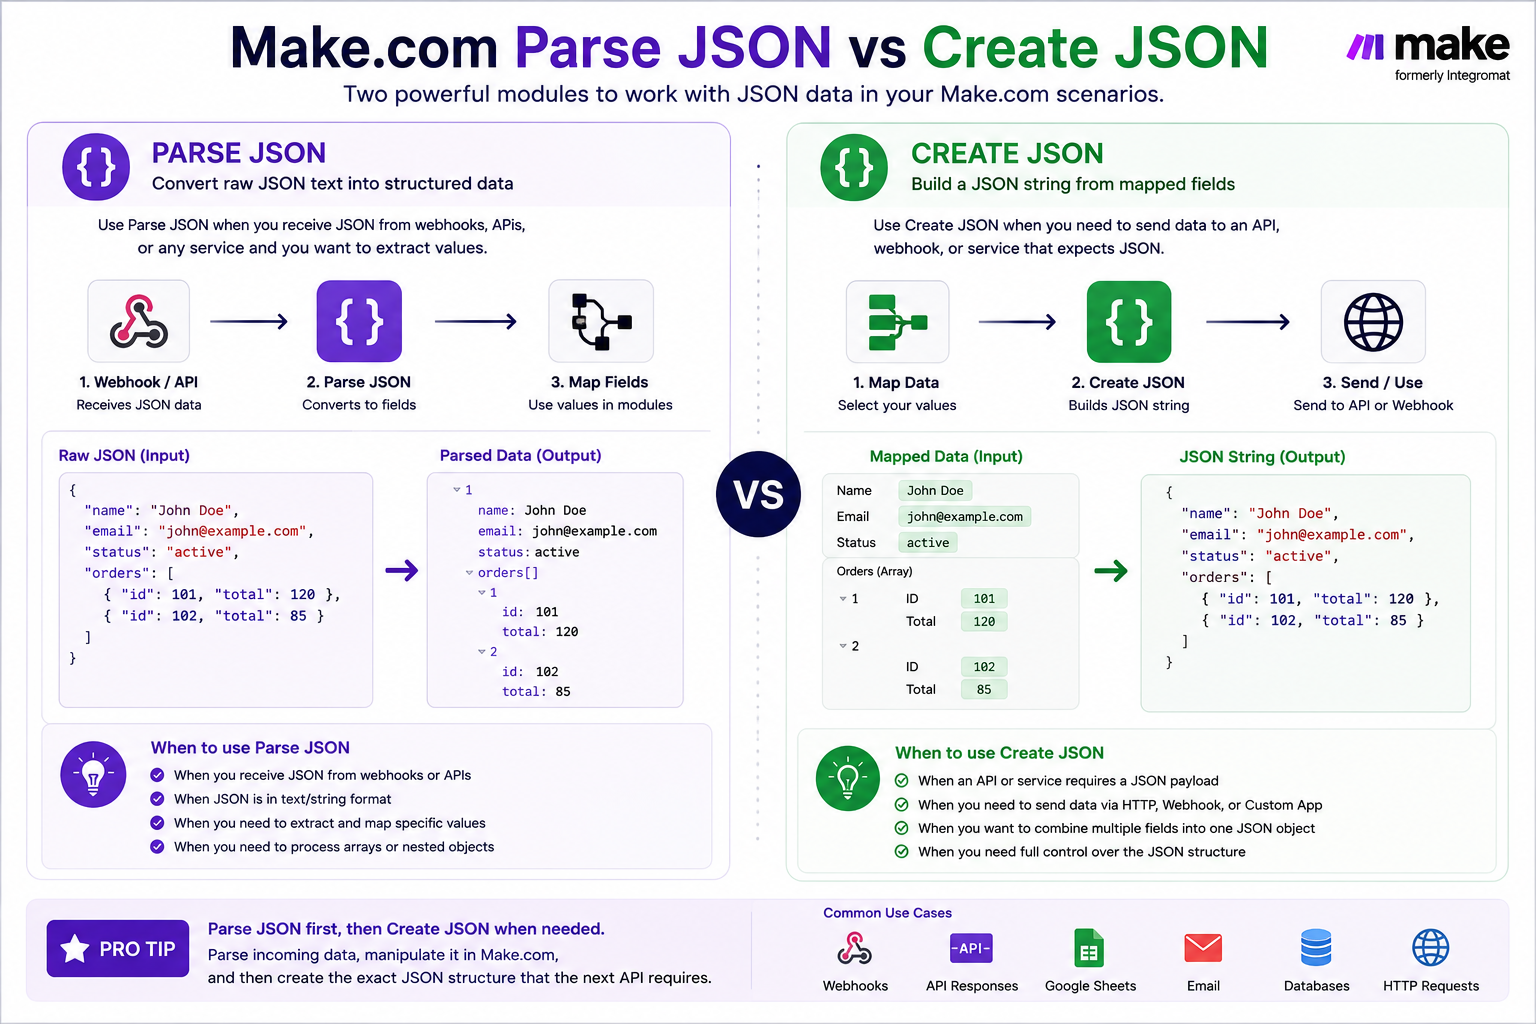
Parse JSON is used when JSON is coming into your scenario and you want to expose its values as structured fields. Create JSON is used when data is going out of your scenario and another service expects a JSON payload.
A simple rule is: parse incoming JSON, create outgoing JSON. Some scenarios need both—for example, parsing a webhook payload, transforming the values, and then creating a new JSON body for an API request.
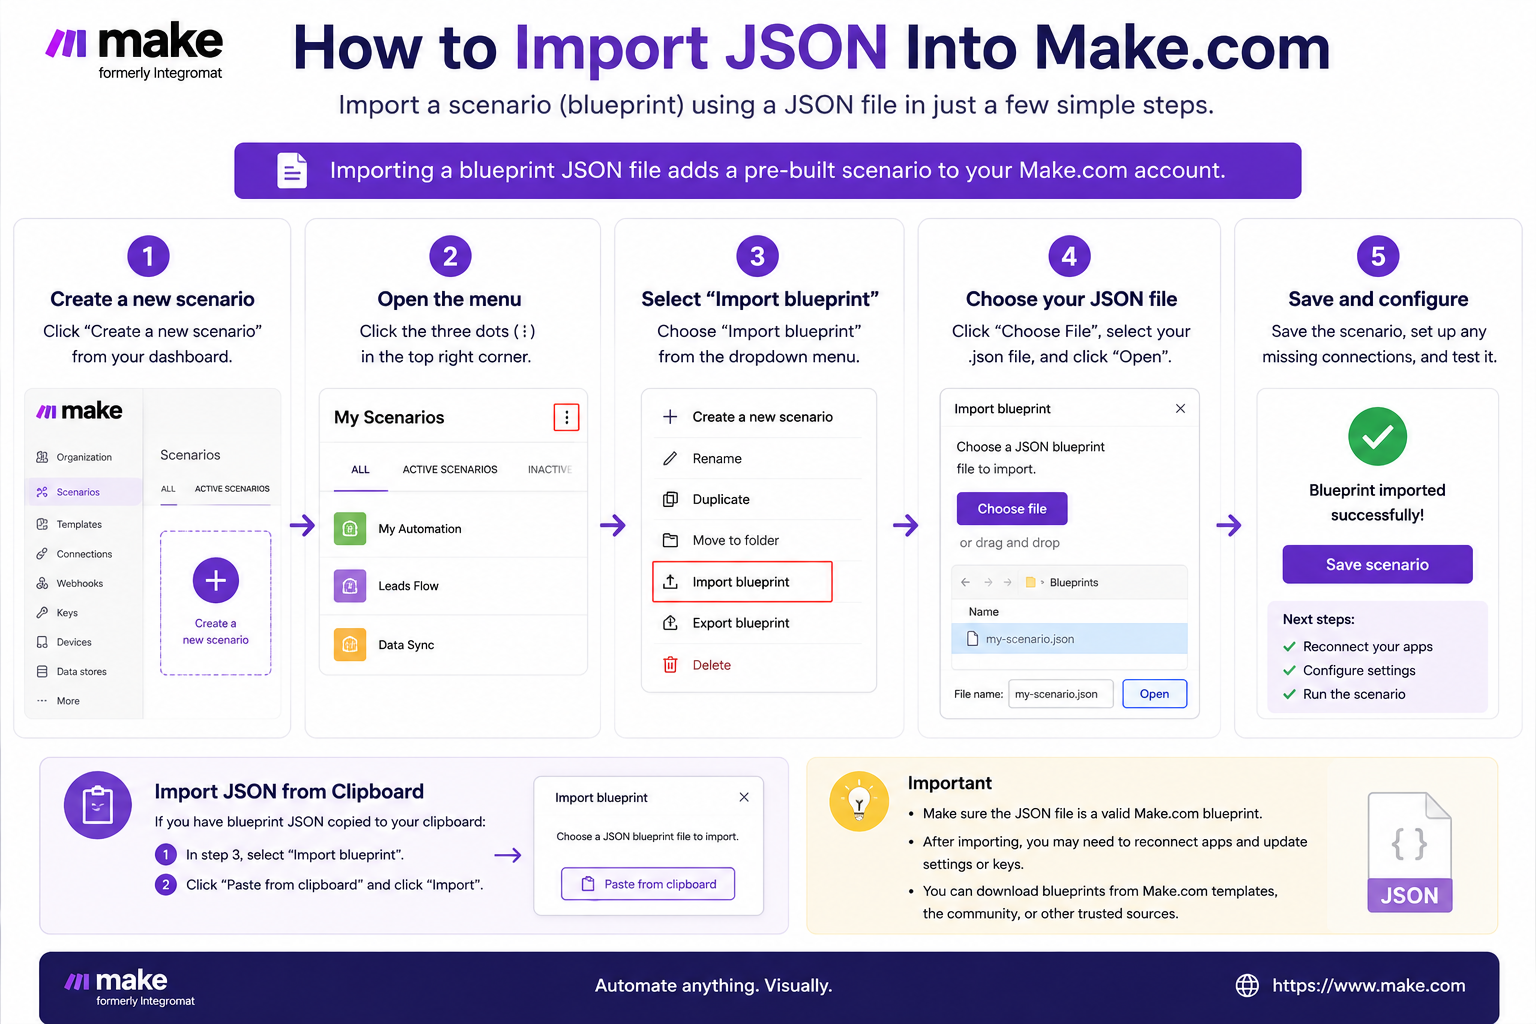
How to Import JSON Into Make.com
If you are searching for how to import JSON into Make, there are two different tasks you may mean:
- Import a Make.com blueprint .JSON file to recreate an entire scenario.
- Import raw JSON data into a scenario so you can parse and map its fields.
Method 1: Import a Make.com Blueprint JSON File
A Make.com scenario blueprint is saved as a .json file. Importing the blueprint recreates the scenario structure, including its modules and routes. You will still need to configure your own app connections and review module settings after the import.
- Open Make.com and create a new scenario.
- In the Scenario Builder, click the three-dot menu in the upper-right corner.
- Select Import blueprint.
- Click Choose File and select the Make.com blueprint file in .json format.
- Click Save. The imported scenario will appear in the Scenario Builder.
- Reconnect your own accounts, review module configuration, test the scenario, and save it before turning on scheduling.
Important: import a blueprint into a new scenario when possible. Make.com warns that importing a blueprint while editing an unsaved scenario can replace unsaved work. Make.com also documents a blueprint size limit of under 2 MB.
Method 2: Paste a Blueprint from the Clipboard
If you received the blueprint as JSON text rather than a downloaded file, Make.com also supports blueprint copy and paste. Copy the blueprint JSON, open a new or existing scenario, right-click an empty area of the scenario canvas, and choose Paste. Then configure connections and test the imported modules.
Method 3: Import Raw JSON Data Into a Scenario
If your JSON is data rather than a scenario blueprint, do not use Import blueprint. Bring the JSON into your scenario through a Webhook, HTTP request, API response, or another source module. If it arrives as a raw JSON string, use JSON > Parse JSON to convert it into structured fields.
- Receive or paste the raw JSON through the appropriate source module.
- Add the JSON app and select Parse JSON.
- Map the raw JSON text into the JSON string field.
- Create a data structure from a representative sample if Make.com requests one.
- Run the module and inspect the structured output.
- Map the imported values into Google Sheets, an API, CRM, database, or another destination module.
If the imported JSON contains an array of multiple items, continue with our Make.com Iterator Tutorial. If the data comes from an external API, see our Make.com HTTP Module Tutorial.
Make.com JSON Tutorial Example Workflow
A practical workflow can follow this pattern: Webhook → Parse JSON → Google Sheets → Tools → Response. A webhook receives the payload, Parse JSON exposes the values, Google Sheets stores selected fields, Tools can format or calculate values, and a response module can return a confirmation.
How to Handle JSON API Responses in Make.com
Many APIs return JSON responses containing status values, IDs, customer records, products, orders, or nested collections. In a Make.com JSON workflow, first inspect the HTTP module output. If Make.com already exposes the response as structured fields, you can map those values directly. If the response is returned as a raw JSON string, add Parse JSON before continuing.
When an API response contains an array, use an Iterator if each item must be processed separately. For nested objects, expand the relevant collection in the mapping panel and select the exact child value you need.
Common Make.com JSON Problems
Use this Make.com JSON Tutorial as a troubleshooting checklist when your JSON workflow does not behave as expected.
Invalid JSON: Check missing commas, quotation marks, or brackets. Fields are not available: Run the source module with representative sample data and rebuild the data structure if necessary. Array data is difficult to map: Use an Iterator when each array item needs separate processing. Wrong values are mapped: Inspect the execution output and verify the exact nested field selected.
Make.com JSON Best Practices for Parsing and Mapping Data
Before activating a production workflow, review the key checks from this Make.com JSON Tutorial and test the scenario with realistic payloads.
- Test with realistic JSON before activating the scenario.
- Inspect module input and output whenever mapping behaves unexpectedly.
- Use clear field names and keep the payload structure consistent.
- Understand whether a value is text, number, object, or array.
- Use an Iterator when you need to process array items individually.
- Keep a sample payload available for future troubleshooting.
Useful Resources for Make.com JSON Automation
For deeper technical reference, use the official Make.com blueprint documentation, the Make Help Center, and the JSON specification overview. Continue learning with the Make.com HTTP Module Tutorial, the Make.com Iterator Tutorial, and the complete Make.com Tutorial for Beginners on XVIFS.
Frequently Asked Questions
How do I create JSON in Make.com?
Add the JSON app, choose Create JSON, define the required data structure, and map values from previous modules into the JSON fields. Run the scenario once to verify that the generated payload matches the format required by the destination service.
What is the difference between Parse JSON and Create JSON in Make.com?
Parse JSON converts incoming raw JSON text into structured fields for mapping. Create JSON does the opposite: it combines mapped values into a structured JSON payload that can be sent to another app or API.
How do I import JSON into Make.com?
If the JSON file is a Make.com scenario blueprint, create a new scenario, open the three-dot menu in the Scenario Builder, choose Import blueprint, select the .json file, and save it. If the JSON is raw data rather than a blueprint, bring it into the scenario through a Webhook, HTTP request, or API response and use Parse JSON when necessary.
Is a Make.com blueprint the same as raw JSON data?
No. A Make.com blueprint is a JSON-formatted file that describes an entire scenario. Raw JSON data contains values that a running scenario may need to parse, transform, or map. Use Import blueprint for scenario files and Parse JSON for incoming raw JSON strings.
What does Parse JSON do in Make.com?
Parse JSON converts a JSON string into structured fields that can be selected and mapped into other modules.
Can Make.com handle nested JSON?
Yes. Make.com can expose fields inside nested objects and collections once the data structure is recognized correctly.
How do I process a JSON array in Make.com?
If you need to process every item separately, pass the array to an Iterator and then connect the modules that should run for each item.
Do I need coding knowledge to use JSON in Make.com?
No. Basic knowledge of objects, arrays, keys, and values is usually enough for common automation workflows because Make.com provides a visual mapping interface.
Conclusion: Master JSON Data in Make.com
This Make.com JSON Tutorial gives you the foundation for working with APIs, webhooks, and structured data. The core process is simple: receive JSON, parse it, identify the fields you need, map them into another module, test the output, and then automate the scenario.